By Joris Dormans (July, 2019)
This is a blog about our development of Unexplored 2: The Wayfarer's Legacy. This game features state-of-the-art content generation, generative storytelling, emergent gameplay, adaptive music, and a vibrant art style.
Unexplored 2 is a roguelite action adventure game where the hero is task to travel the world in order to destroy a magic staff. It features perma-death, but when your hero dies you get a chance to keep the world, so you can uncover its many secrets over the course of several runs. In a way, the world is one of the most important and persistent characters in the game. In this blog I'd like to share how we generate it.
There are several ways in which you can approach world generation for fantasy games. For example, you can use simulation techniques to generate a realistic topography and populate the world from there. Instead, we choose a different approach for Unexplored 2: we used a process where we sketch a rough outline first and try to fill in the map with in a way that optimizes the affordances and gameplay opportunities the map has to offer.
It all starts with a random Voronoi graph with 80 cells placed on a map with a 3:2 aspect ratio:
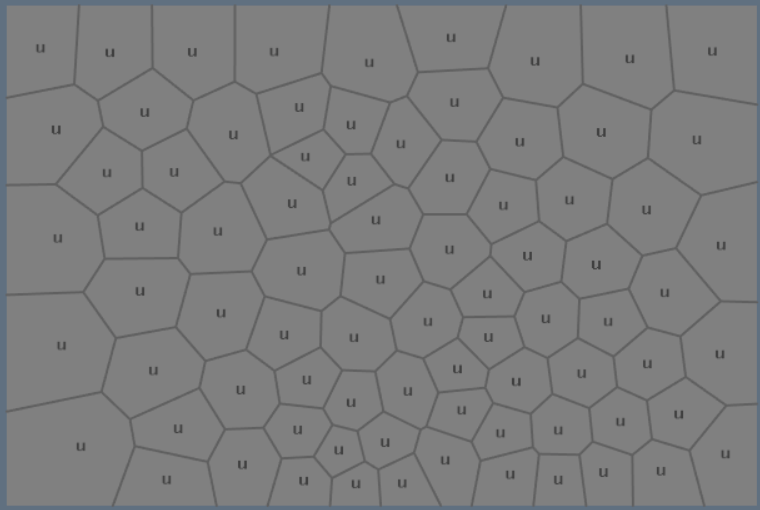
Figure 1 - The initial Voronoi
We use a Voronoi because it has a fairly natural distribution of cells and because the structure can be treated as a graph with each cell being an individual node and each edge a connection between nodes. This is useful as we use graph grammar rules to generate the map.
In the first step the cells on the western edge are set to ocean. Then we grow the ocean a little creating a more interesting coast lone, and set the remaining cells to be land mass. A starting location is picked along the coast and a goal location is picked somewhere on the eastern side. Each cell in the graph marked with its distance to the start and the distance to the goal. Distance in this case is measured in the number of cells between two locations.

Figure 2 - Land and sea
Obviously placing the ocean always on the west is just a choice (Tolkien made us do it). It is easy to make the whole map an island, or have the ocean cover other edges of the map. What matters for us, is that this creates a consistently large playing area. But we don't rule out adding other templates and variations in the future.
The next step is to make sure that the journey will not be too easy. After all, 'one does not simply walk into Mordor'. The way we achieve is also lifted directly from The Lord of the Rings: we simply make sure there is a mountain range between the start and the goal:
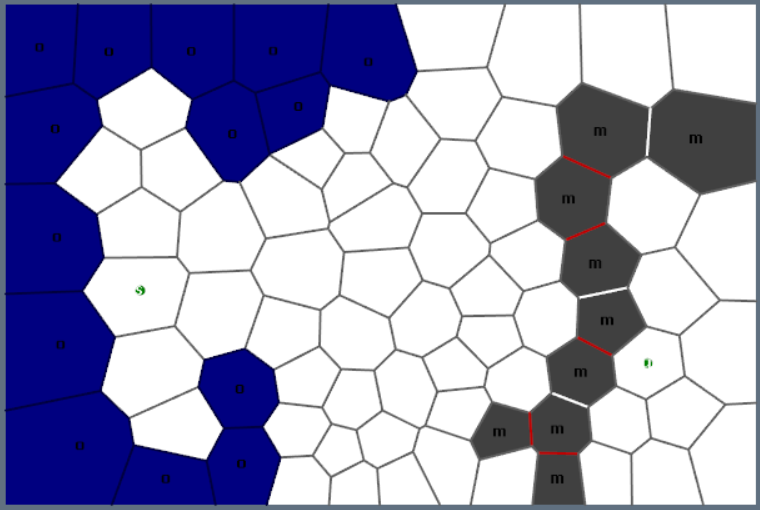
Figure 3 - A Tolkienesque mountain range
The mountains are started somewhere close to the goal and then allowed to grow using the following graph grammar rule, which basically changes one open cell into a mountain for an open cell that is next to one (but no more) mountain cell, relatively close to the goal, and relatively far from the starting location:
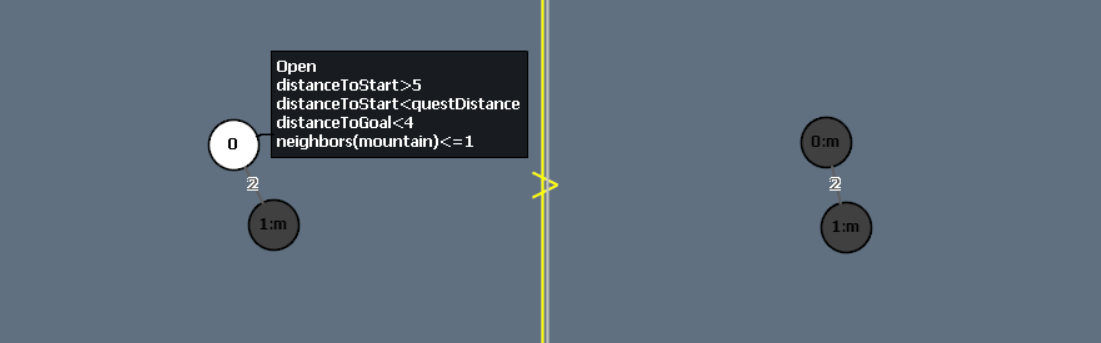
Figure 4 - Graph grammar rule to grow the initial mountain range
Mountains form a barrier and can only be crossed at passes (the white borders in Figure 2 above), but not elsewhere (the red borders).
Unexplored 2 has journey from the start location to the goal. In order to tempt the player to divert from the most direct route and explore the rest of the map a number of 'adventure sites' are placed at some distance of the start and goal location. Creating a nice spread of potential interesting travel destinations. Each site is placed inside a region of a different type. In this case the goal is placed in swamp (s), a haven (green h) is placed in a hill area close to the start, and other sites are placed in a desert (d), forest (f), and a barren area (b). Orange edges indicate the borders between the regions.
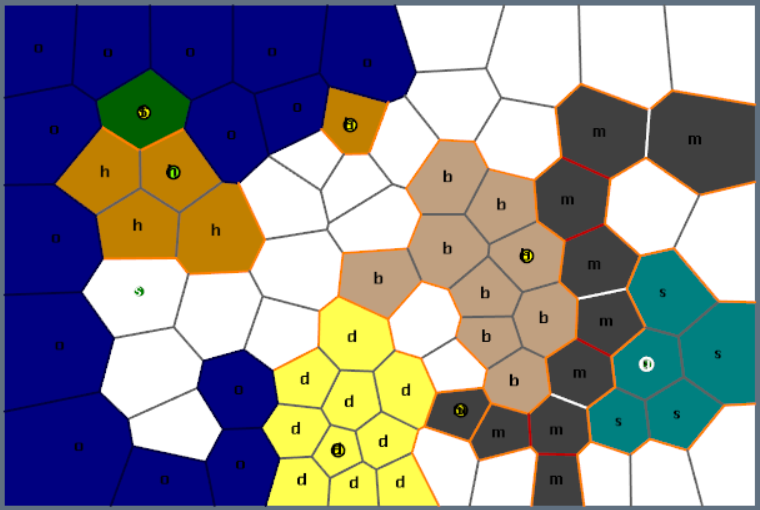
Figure 5 - Adventure sites
The remaining cells are randomly grouped into additional regions until every cell is assigned a region on the map. The terrain types for these regions are left undetermined for now.
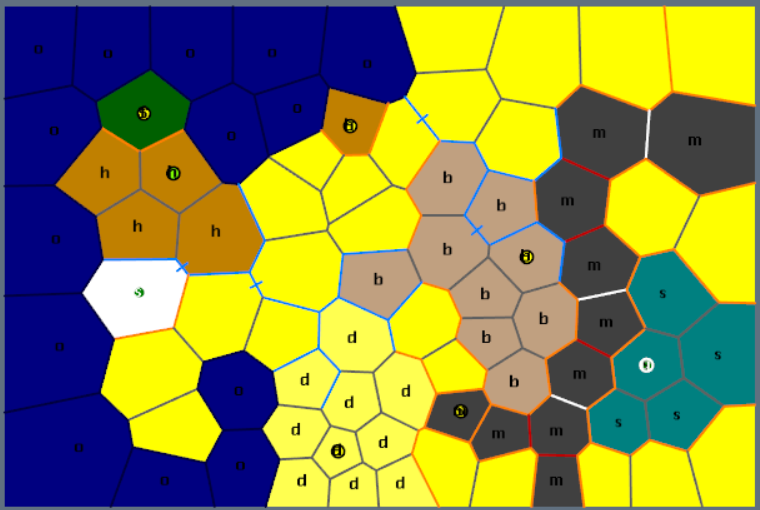
Figure 6 - Regions and rivers
Next rivers are added to the map. Initially rivers are allowed to grow along the borders of regions. Unlike a realistic world generation process we choose to start growing rivers at the ocean, selecting a new edge to grow into at random, favoring to grow alongside mountains as the go along.
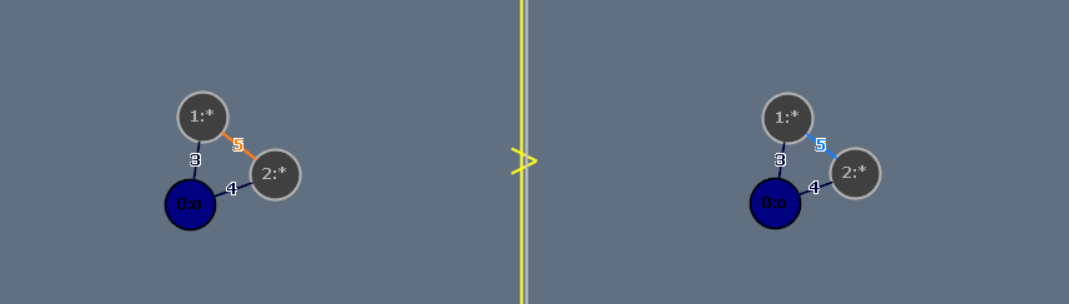
Figure 7 - Graph grammar rule that changes a region border next to an ocean into a river
After rivers have been added, the region types are filled in and reevaluated. In this case, more forest are added and the desert area in the south is changed into a plain because it was next to the ocean and far to the south (our map is located in the southern hemisphere, hence the south is cold). At a later stage we might take the opportunity to change the desert into something more interesting, such as a frozen waste.
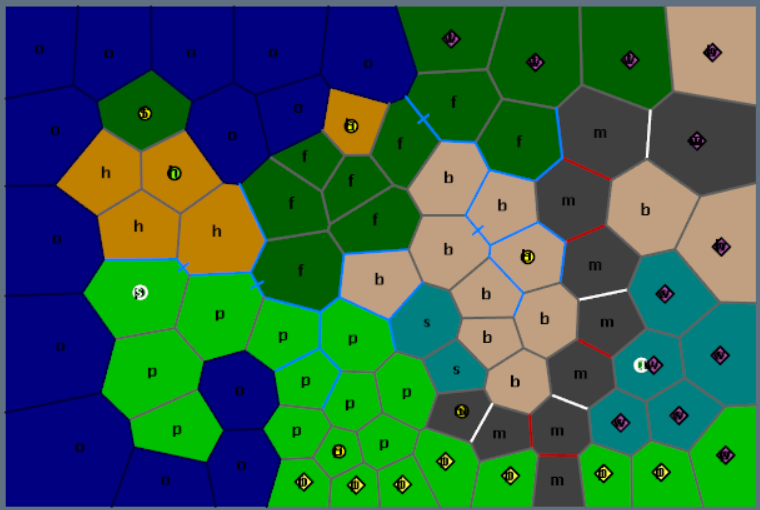
Figure 8 - Complete topography
Once the regions are set, rivers are allowed to grow a little more, especially through terrains like hills and swaps. Depending on their length rivers be narrow, wide, or very wide. Only narrow rivers are easy to cross, for the wider rivers certain edges are marked to indicate points where the river can be crossed.
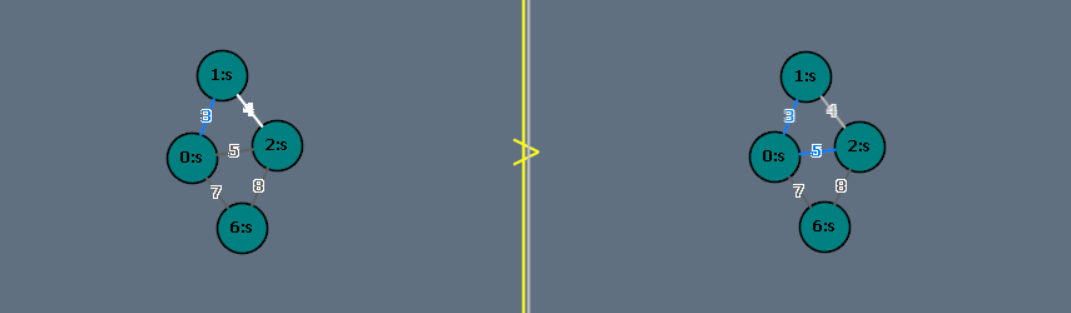
Figure 9 - Graph grammar rule to grow a river through a swamp
The topography is fairly basics and we still need to fill in a lot of details. From a design perspective regions (not cells) are the best unit to work with in this respect as we want regions to form coherent units in the experience of the game. To make working with regions a little bit easier, the voronoi graph is reduced to a graph representation where all cells of each region are combined into one single node.
Based on the relative distance to the start and the goal regions are assigned a difficulty and a number of opportunities and dangers are generated accordingly.
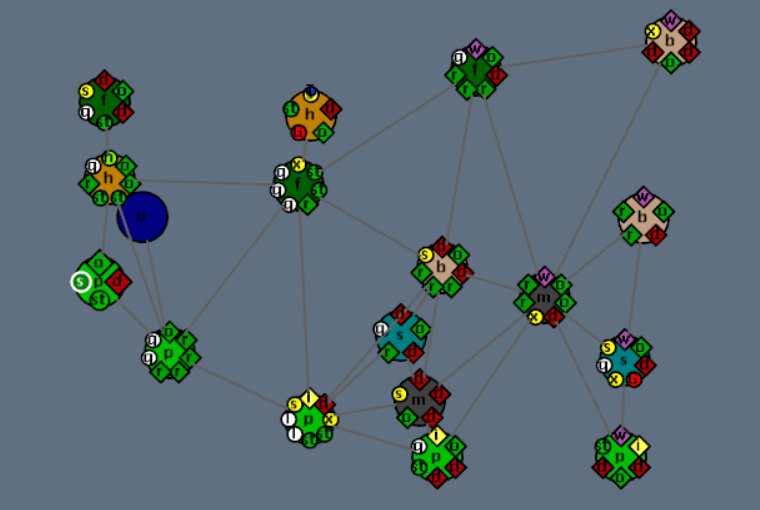
Figure 10 - Region graph
At this stage the generator starts to look for interesting gameplay opportunities. Using several graph grammar rules a large forest with high difficulty will be assigned different attributes than a small, low difficulty swamp harboring an adventure site.
At this stage special terrains, such as purple 'obscuri' forests or red sand desert are also added to the mix. When generating the game in the world we have the option to request certain special features such as special rare terrain, or special quest content. These are processed first. To the best of the generator's ability, it might be that no good fit is found, at which point either we need to generate a new or continue without the requested feature.
One interesting effect is that if certain special terrains require slightly rare conditions to emerge then the terrain type automatically becomes rare content. For example a special quest might require a large swamp area with a river which will not be present in every world. The downside is that sometimes rarity becomes hard to control or design as there literally is no simple slider to push up if we want to make such a terrain type or quest more frequent.
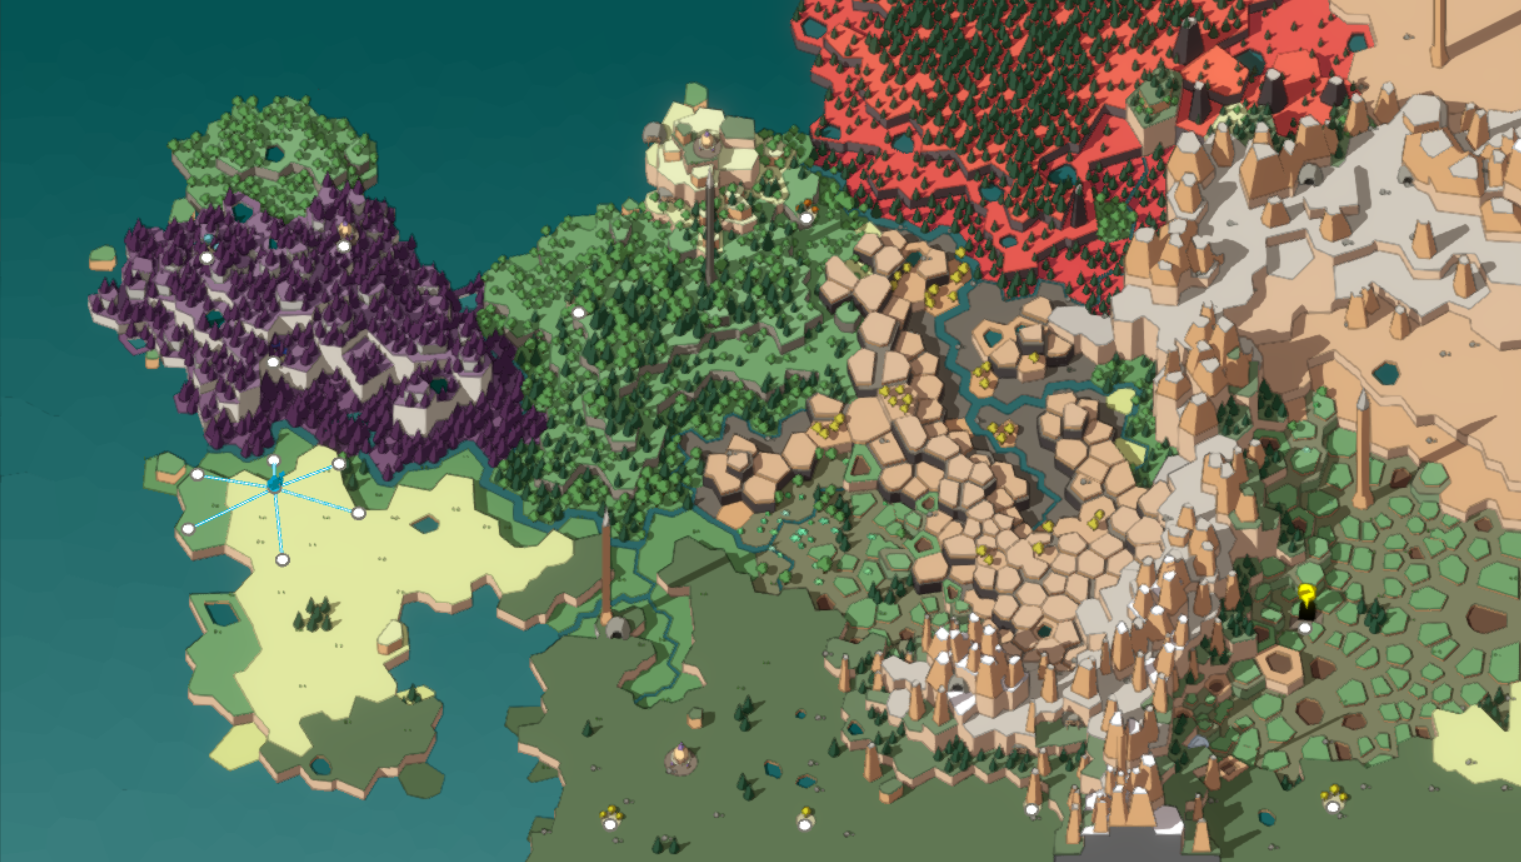
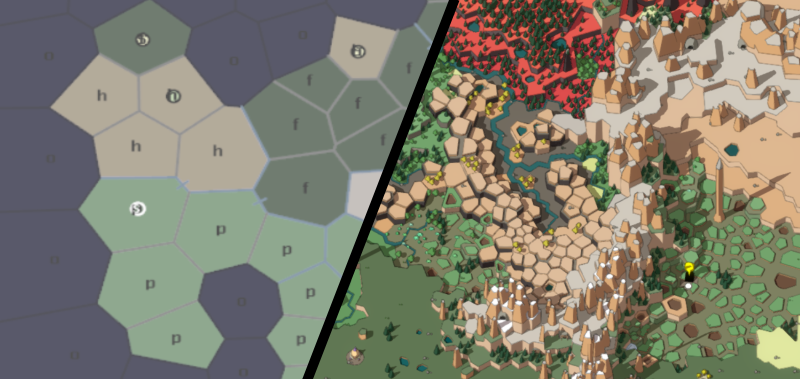
Figure 11 - The map as it appears in the game
Up until this point the map is all data. The next step is to create the visual representation based on the map. To this end we generated a new Voronoi diagram with a higher resolution (about 1200 cells) and map each smaller cell to the cells of the original map data. This creates a better resolution of details. Figure 10 shows how to original cells map to the visual map:
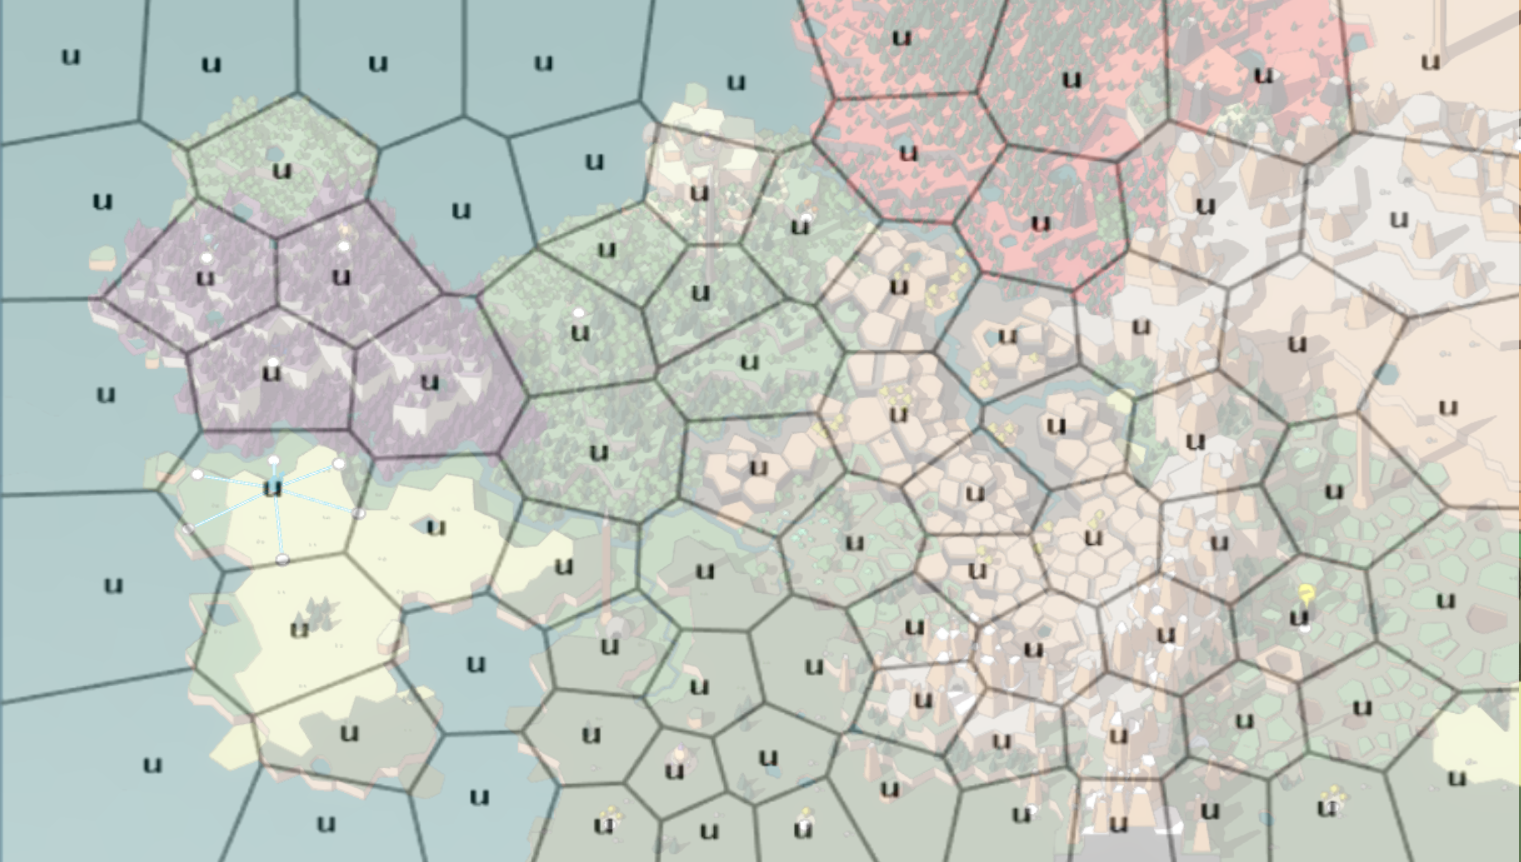
Figure 12 - Original cells projected unto the map
Individual cells can be raised and lowered to create elevation, and colored and decorated to suggest different terrains. Some of these decorations are assets such as trees which can vary in size and density based on the relative temperature and humidity of each cell. For now we're using a very simple algorithm to approximate individual climate using longitude, latitude (it gets dryer towards the east), elevation and closeness to water.
Other decorations are build from simple geometry based off the high resolution Voronoi graph. This can be easily seen in image 13 below. This geometry includes slightly sloped mountain peaks, elevated patchwork to create the impression of a broken, barren landscape, and sunken centers to create pools.
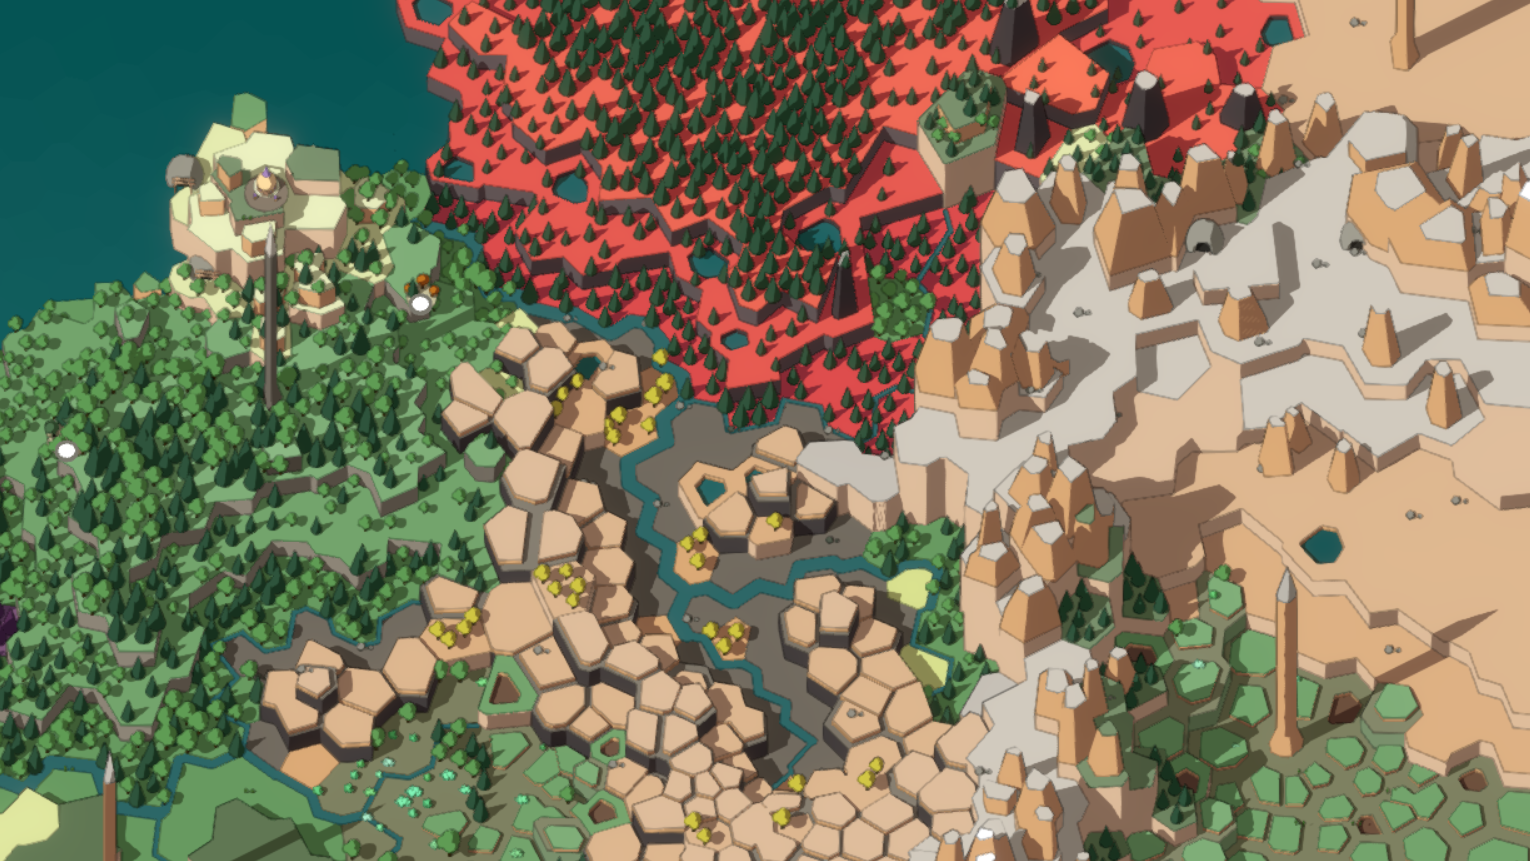
Figure 13 - Map detail showing how decorations use geometry based on the Voronoi graph
Regions and their associated terrain types play an important role in the generation of these details. As can be observed in the figure above, forest rise towards their center, as do hills and mountains. Rivers are never elevated (to save us the trouble of trying to do so consistently). Terrain is blended a little so that height difference are not too pronounced where not intended, and interesting borders are created. In many cases, these blended terrains offer ample opportunities to liven op de map with rare features.
The world is of Unexplored 2 is not a continuous world. Players travel from node to node and can choose (or are forced) to explore gameplay areas each node represents. Connection between nodes determine where the player can travel. To place the nodes on the map we use to original low resolution Voronoi diagram. A node is placed on each cell and on each border between cells, as can be witnessed in the image below:

Figure 14 - Network of nodes placed on the Voronoi graph
Certain connections are special. As mentioned above wide rivers can only be crossed at certain points, and mountains also create barriers. For uncrossable rivers the node that would have been placed on the river is split in two and each node is moved away from the river a little. Where a crossing is needed the node is actually split in three so that a bridge node is created that conveniently only has two connections (and exits) on each side of the river. For mountains and passes across mountains something similar is done.
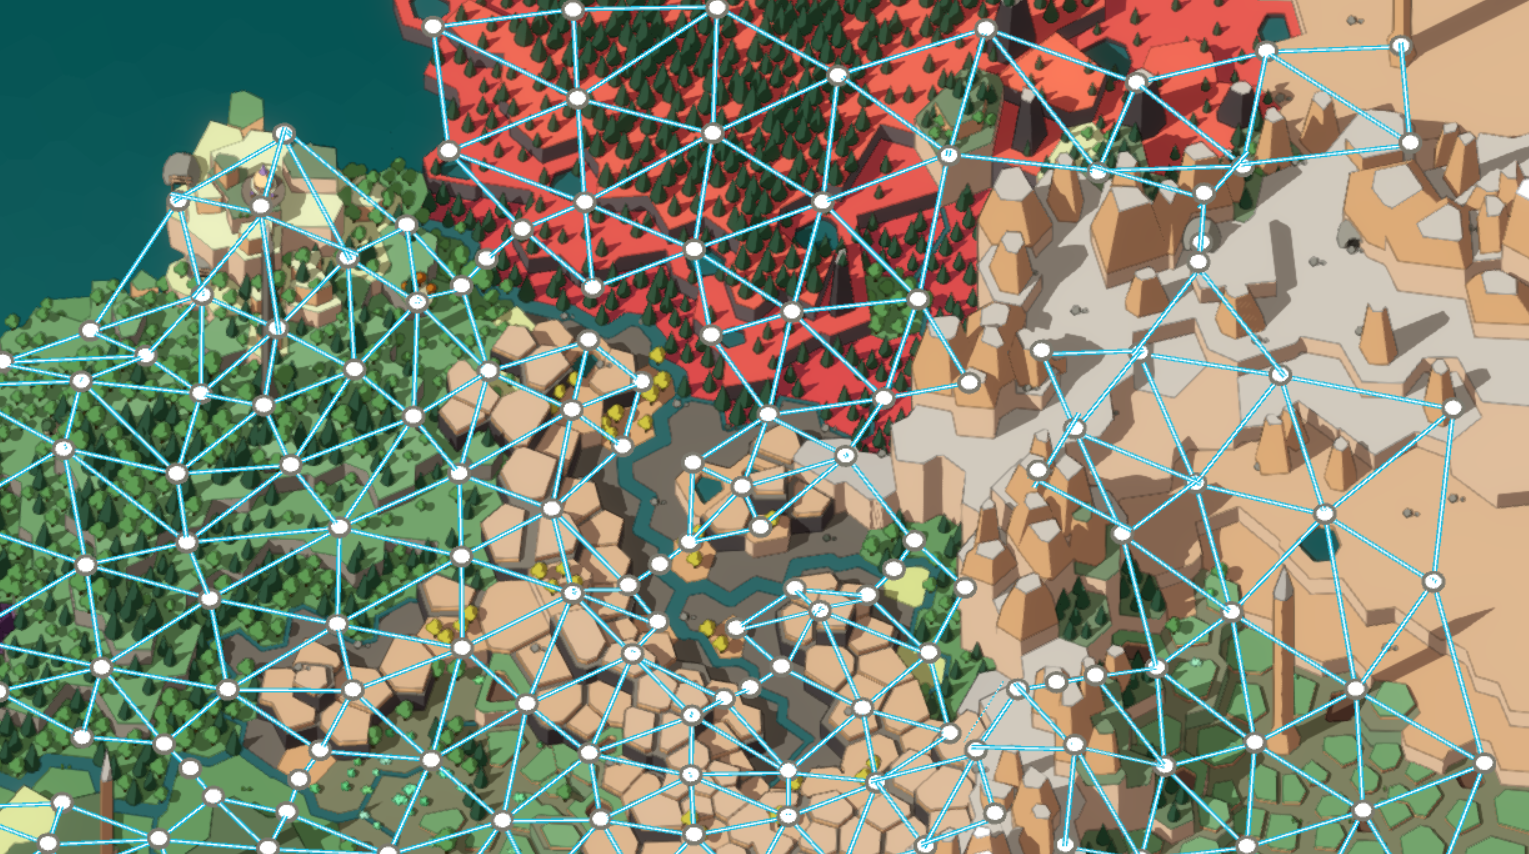
Figure 15 - Detail of the node network showing rivers and mountains
Some of the nodes are already marked out as special sites in the generated data. The area templates associated with these sites often indicate special features to appear on the map (for example a volcano, a village, a mud pool, or a group of trees). Although, in some cases these features are only added after the player has visited the area and found its secrets. All other nodes are assigned templates based on the region they belong to and their relative position within that region.
Each region has a number of types of locations. Typically a region has one 'heart' location assigned to a node quite central in the region, or a 'smallHeart' location if the region is relatively small. A number of 'rare' locations are scattered out across the locations not on the regions adge, and finally all other locations are drawn from a random destination table associated with the regions terrain. Figure 16 shows sample entries from the table we use to populate forest and plain regions (the 'locations' in this table are the random encounter location the game uses when travelling between each node).
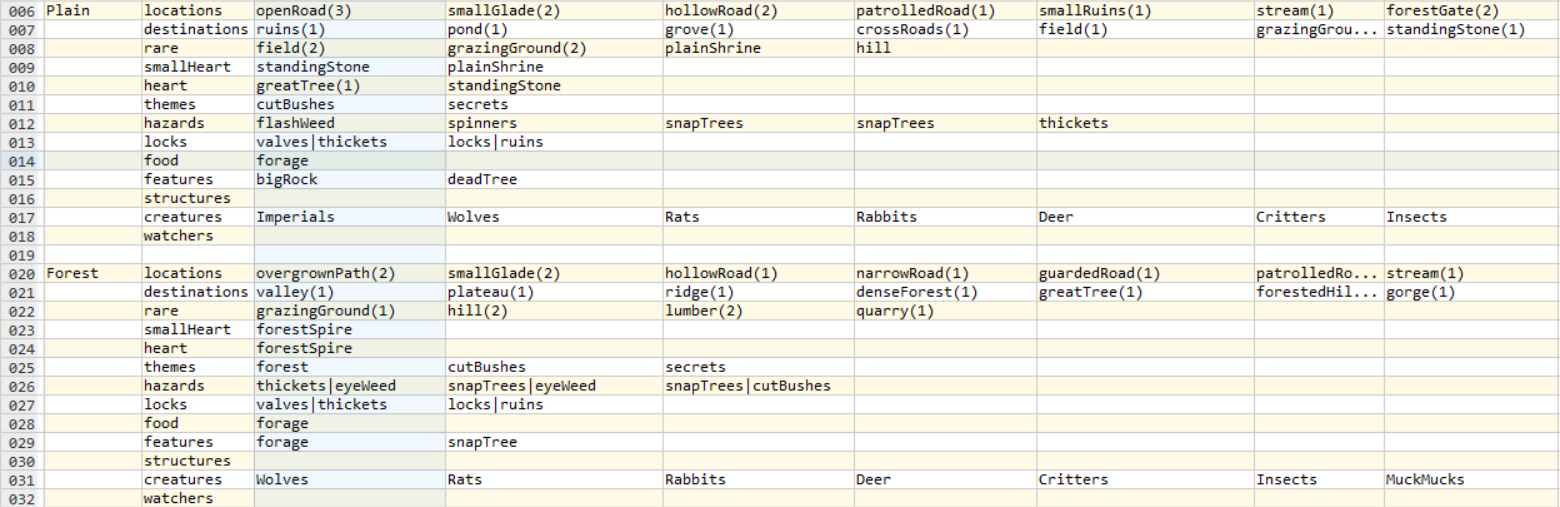
Figure 16 - Random destination table
At the moment of writing the map generation is still a work in progress. We are constantly adding details as the game's content keeps growing. But I don't expect the general approach to change much.
We are quite happy with the results, as in our humble opinion the maps are quite beautiful. But what's more important, they are readable: players can predict where barriers and dangerous terrains are to be found. A lot of information is there and we don't hide it behind a fog of war. The map facilitates anticipation and foreshadowing which are two key gameplay design features. We hope that when the game is released in full, players will enjoy simply pouring over the map and plan their journey.
If you are interested in learning more about the game please check us out on Epic Game Store.
Contact: info@ludomotion.com